Wednesday, January 14, 2015

Add Popup Email Subscription Widget with Light Box Effect

This is really a great widget because any viewers can subscribe your blog by simply write own Email address in popup Email widget. It get the best attention of the visitors which makes them so effective in doing their job. A visitors either have to subscribe your blog or click on a cross icon to continue suffering on your blog. If you have quality content on your blog then many viewers will want subscribe your blog, so this widget will be very helpful for you.

Note: The code I have provided below will show-up the subscription box when the page has been loaded.

blogger-RSS-subscription-box


Install Popup Email subscription Box in Blogger:


- Go to Blogger and log-in to your account

- Select your blog and navigate to the "Template" section

- Hit on "Edit HTML" Button

- Click anywhere inside the code and press Ctrl + F to open the search box

- Find <body> tag and replace with the given below code

<body onload='lightbox_open()'>

- Now just after that paste the given below code


<div id="light"> <div style='position:absolute;left:-20px;top:-20px;text-align:center;font-size:31px;width:40px;height:40px;background-color:white;border:4px solid black;border-radius:100%;color:black;font-family: Impact, Haettenschweiler, "Franklin Gothic Bold", Charcoal, "Helvetica Inserat", "Bitstream Vera Sans Bold", "Arial Black", sans serif' onClick="lightbox_close();">X</div>  <center><img style='width:400px;height:125px;' src='https://lh5.googleusercontent.com/-wsjbg3uaeUU/VLbFISkW_xI/AAAAAAAAAWw/jYnp3D3MLQc/w400-h125-no/MakeMoneyOnline72.BlogSpot.png'></img></center> <form id='sub' action="http://feedburner.google.com/fb/a/mailverify?uri=makemoneyonline-72" method="post" target="popupwindow" onsubmit="window.open('http://feedburner.google.com/fb/a/mailverify?uri=makemoneyonline-72', 'popupwindow', 'scrollbars=yes,width=550,height=520');return true"><center> <p style='font-size:35px;margin-bottom:15px;'>Subscribe To Our Mailing List</p> <input class='sbox' id='sbox' type='text' name='uri' placeholder='Your Email Address...'/></center><input class='sbutton' id='sbutton' style='border:0; vertical-align: top;' name='upload' type='submit' value='Subscribe'/></form><center><p style='font-family:Source Sans Pro, sans-serif;' ><b>P.S</b> I will never spam you...100% GUARANTEED!</p></center></div><div id="fade"></div><link href='http://fonts.googleapis.com/css?family=Source+Sans+Pro' rel='stylesheet' type='text/css'/>
<style>input:focus{outline: 0.5px solid #4c004c;}#sbutton {padding: 5px;font-size:30px;margin-top:10px;width:500px;margin-left:50px;:font-family: Candara, Calibri, Segoe, "Segoe UI", Optima, Arial, sans-serif;background-color:#DFDFDF;}form { margin:0px;font-family: Candara, Calibri, Segoe, "Segoe UI", Optima, Arial, sans-serif;}#sbox {width: 500px;height:30px;vertical-align:bottom;}#sbox:focus{border: 1px solid #4c004c;}#fade{    display: none;    position: fixed;    top: 0%;    left: 0%;    width: 100%;    height: 100%;    background-color: #000;    z-index:1001;    -moz-opacity: 0.7;    opacity:.70;    filter: alpha(opacity=70);}#light{    display: none;    position: fixed;    top: 29%;    left: 29%;    width: 600px;    height: 400px;    margin-left: -150px;    margin-top: -100px;                   padding: 10px;    border: 2px solid #FFF;    background: white;    z-index:1002;    overflow:visible;}</style><script>

window.document.onkeydown = function (e){    if (!e){        e = event;    }    if (e.keyCode == 27){        lightbox_close();    }}function lightbox_open(){ window.scrollTo(0,0);    document.getElementById('light').style.display='block';    document.getElementById('fade').style.display='block'; }function lightbox_close(){    document.getElementById('light').style.display='none';    document.getElementById('fade').style.display='none';

}</script>

Customization:


* Change the Blog Image/Logo URL in red with your logo url ( you can make this url by uploading image/logo on Google + site )

* Replace the Feed Burner "User Name" in pink with your Feed Burner User Name

* Now it's complete. Hit on "Save" template button

Recommended: Free Download CustomizeMe SEO Friendly Template

Do let me know how this widget is working on your blog.If you are having any trouble with this subscription box then leave your experience down in the comment section below. I'll fix any bugs present in this widget and off-course if you liked it just stay turned for more :)


Free Download CustomizeMe Blogger SEO friendly Template


This the theme where you can do easily each and every thing without having any trouble. CustomizeMe is highly customizable template and SEO friendly to index your blog faster. It has been designed in a way that can be easily customized according to your needs and requirement without having change in code of this template. All you need to do is press the button of "Customize" and now you are ready to customize your theme according to your own will. Just try this template for the better ranking and get result in positive way.

Powerful Features Of This Template:


 1. Movable/Fixed Left Navigation Menu Bar
 2. Customized Popular Post
 3. Flat and Grid Design
 4. Recent Comments
 5. Recent Posts
 6. Expandable Search Bar
 7. Page Numbering
 8. Author Bio Box With Image
 9. Floating Social Bar Widget
10. Related Posts with Thumbnail
11. SEO Friendly
12. 404 Error Page

    Download Template:


    Check-live-template

    Download-Theme-Free

    Recommend: Also watch Attractive and SEO Friendly Widget for Blogger

    Install Customize Me Template:


    Installation of CustomizeMe template is very easy even installation of any theme is very easy, you just follow given below steps.

    >> Go to Blogger Dashboard and open the targeted blog

    >> Click on "Template" button and hit "Backup/Restore" button on top right side and "Download full template"

    >> Open the CustomizedMe downloaded theme from this blog and open in Notepad/WordPad

    >> Select all the code by pressing Ctrl + A and copy

    >> Now again Go to "Template" and >  "Edit HTML"

    >> Select all the code of your current template and delete it and paste the code that you just copied from Notepad

    >> After that Preview your blog, if every thing is right then "Save" template.


    Note: This method might delete some of your widget, and if you want to keep this widget then simply > Go to "Template" > Hit on "Backup/Restore" button and upload/Browse CustomizeMe template. (Ignore above method)

    Recent Posts and Comments Widget:


    GO to "Template" > "Edit HTML" and click anywhere inside the code and press Ctrl + F to open the search box and replace the given below address with your blog address. ( You will find it twice and must change it with your link )

    http://makemoneyonline72.blogspot.com

    Enable "About Author Profile":


    Go to "Layout" then "Edit" link of the "Blog Posts" element. From the popup window check on the "Show Author Profile Below Post" option and hit save.

    Customize Colors and Fonts in "CustomizeMe" Template:


    You can customize and change fonts and font colors. For this purpose Go to "Template" > "Customize". Here you can customize lots of cool stuff, even you can do each and every thing like change all the default fonts, text and background colors etc. 

    I hope you will enjoyed this Template. Please don't forget to share this post with your friends on social media sites, also share your thoughts and queries in comment section.


    Tuesday, January 13, 2015

    Add/Install Google+ and Blogger Comments With Blogger

    Users can easily comment on your every single post while reading your post or using the Google+ account. Today I'm going to show you how to attach/add Google+ and blogger comments only on blogger platform. It means when any webmaster create a post, he/she shares this post on Google+, So your post also available in Blogger and Google plus. Users/Viewers can comments on your post even on your Google plus share post. As you know Google plus is Google property and it's very powerful for SEO. If any visitors comes to your post from google plus, Google consider that visitors as a organic visitors.

    Install-blogger-and-Google-plus-comments


    By this way you can increase blog Traffic, Google plus followers and Google plus circle. You can take advantage of the google plus comment system on blogger. You can reply easily of google plus commentator as well as blogger on one platform.

    How to Integrate Google Plus and Blogger Comments:


    To add this installation as simple as possible, We used inline JQuery and CSS, but anybody can change it later. So let's start to adding it.

    Step 1. Go to your Blogger Dashboard, Open specific Blog, > then select "Template" and click on "Edit HTML"

    Step 2. Clock anywhere on the code and press Ctrl + F to open the search box, Now Find the code below

    <b:include data='post' name='post'/>

    Step 3. Copy the given below code and paste just <b:include data='post' name='post'/> after it

     <b:if cond='data:blog.pageType == &quot;item&quot;'><style>#comments, #gplus-comments-visibility {display:none;} .comments-icons {background: url(https://blogger.googleusercontent.com/img/b/R29vZ2xl/AVvXsEhzcCTBZ_-h57pePrMtEkaI42Sq47DrWEav2oKTn3GmZdkelzeN8U-udDhzyD_sxb8Y7X2WLCYzP1cYHPkwcBn_PObM8tZ4sjLpeCTFhtN3TBL28taM2cO7TVxNXp-is4f_DzJ2wLjJuY61/s1600/speech-bubble.png) no-repeat; font-size: 20px; font-family: &quot;Arial Narrow&quot;,Arial,sans-serif; color: #555; font-weight: bold; padding: 18px 15px 0; height: 70px; } .comments-icons a img {vertical-align: middle;}</style><div class='comments-icons'>Show Comments: <a class='show-hide-comments' href='javascript:void();' onclick='$(&quot;#gplus-comments-visibility&quot;).slideToggle();$(&quot;#comments&quot;).hide();'><img class='gplus-icon' height='35' src='https://blogger.googleusercontent.com/img/b/R29vZ2xl/AVvXsEgPukpZtRu0YWsabmSHkQuVME2bX9Yu7a9suM09Ym-zlfjeGQv6HzZD183wGOzWKpc7cTpmKAmTWcQniOR-bO4zyW0AmIzqaLvUj5sxiVb5N6pLYEvyoMUmhCXO1nXdjOsj2OVjgoUlFR4T/s1600/google-plus-logo.png' width='35'/></a> OR <a class='show-hide-comments' href='javascript:void();' onclick='$(&quot;#comments&quot;).slideToggle();$(&quot;#gplus-comments-visibility&quot;).hide();'><img class='blogger-icon' height='35' src='https://blogger.googleusercontent.com/img/b/R29vZ2xl/AVvXsEiefCe37tAmKs5c7ASQs8atTqZKfUWnzSLR3DCXcVnOWO0BQ32UZqbsEr73AYFZ-5W4zr5_-rjkFdc879_2zwhSRnYTHrnOI5iJL533LL6qRqI9j3F8IwThald1kapvB8MkQPw7H_evI7Zk/s1600/blogger-logo.png' width='35'/></a></div><div id='gplus-comments-visibility'><div class='g-comments' data-first_party_property='BLOGGER' data-view_type='FILTERED_POSTMOD' data-width='550'expr:data-href='data:post.url'/></div>       </b:if>

    Step 4.  The code data-width='550' indicate that you can change easily by increasing/decreasing '550' according to your blog size.

    Step 5. Now Save your Template, and check your blog to see if you have successfully added this code to blogger

    Note: If this code is not working for you it means you must have to put JQuery script in <head> </head> section 

    Add JQuery script: 

    Paste the given below code before the </head> tag

    <script src='https://ajax.googleapis.com/ajax/libs/jquery/1.6.4/jquery.min.js' type='text/javascript'/>

    You have Done. Your reader will enjoy the flexibility that your site provides and you will also get benefit from the inclusive services offered by Google.

    Share this post of this site with your friends on social media sites. If you have any Question and any problem feel free to contact me in comment section.


    Add Social Sharing Icons with Email Subscription Widget Below Every Post

    You have a blog and if your blog is with out collaboration of social media sites, then may be your blog worth is nothing in online world. In this post I will tell you how to add social sharing buttons with Email subscribe widget and facebook page like icon. If you add this widget in your blog, your viewers can easily share/like and subscribe your every post. This widget can help you a lot to popular you in social media sites.

    Add-Social-icons-with-Email-RSS-widget

    Recommended: Add Attractive Email Subscription Widget in Blogger

    Instructions to Add Widget in Blogger:

    1- Go to blogger Dash Board →  Template →  Edit HTML

    2- After it Find the shown code below by pressing Ctrl+F (Click anywhere in code then press Ctrl+F)

    <data:post.body/>
    3- Now Copy code shown below and paste just after ( <data:post.body/> ) it.

    <b:if cond='data:blog.pageType == "item"'><style>p#socialicons img { -moz-transition: all 1s ease-in-out; -webkit-transition: all 1s ease-in-out; -o-transition: all 1s ease-in-out; -ms-transition: all 1s ease-in-out; transition: all 1s ease-in-out;} p#socialicons img:hover { -moz-transform: rotate(360deg); -webkit-transform: rotate(360deg); -o-transform: rotate(360deg); -ms-transform: rotate(360deg); transform: rotate(360deg);}.emailbutton{background:#f7f8f9;background:-webkit-gradient(linear,left top,left bottom,color-stop(#f7f8f9,0),color-stop(#e9e9e9,1));background:-webkit-linear-gradient(top, #f7f8f9 0%, #e9e9e9 100%);background:-moz-linear-gradient(top, #f7f8f9 0%, #e9e9e9 100%);background:-o-linear-gradient(top, #f7f8f9 0%, #e9e9e9 100%);background:linear-gradient(top, #f7f8f9 0%, #e9e9e9 100%);filter:progid:DXImageTransform.Microsoft.gradient( startColorstr='#f7f8f9', endColorstr='#e9e9e9',GradientType=0 );border:1px solid #ddd;-webkit-border-radius:4px;-moz-border-radius:4px;border-radius:4px;padding:6px 12px;margin:0;-webkit-box-shadow:0 1px 0 #f9f9f9 inset, 1px 1px 1px rgba(223,223,223,0.4);-moz-box-shadow:0 1px 0 #f9f9f9 inset, 1px 1px 1px rgba(223,223,223,0.4);box-shadow:0 1px 0 #f9f9f9 inset, 1px 1px 1px rgba(223,223,223,0.4);color:#888;text-shadow:0 1px 0 #fff;line-height:1.2;cursor:pointer;font-size:13px;}.emailbutton:hover{background:#f1f1f1;background:-webkit-gradient(linear,left top,left bottom,color-stop(#f1f1f1,0),color-stop(#e0e0e0,1));background:-webkit-linear-gradient(top, #f1f1f1 0%, #e0e0e0 100%);background:-moz-linear-gradient(top, #f1f1f1 0%, #e0e0e0 100%);background:-o-linear-gradient(top, #f1f1f1 0%, #e0e0e0 100%);background:linear-gradient(top, #f1f1f1 0%, #e0e0e0 100%);filter:progid:DXImageTransform.Microsoft.gradient( startColorstr='#f1f1f1', endColorstr='#e0e0e0',GradientType=0 );text-decoration:none !important;}.email{clear:both;width:100%;margin:10px 0;}.emailform{position:relative;width:300px;margin:0 auto;}.emailinput{width:200px;height:18px;margin:0 auto;padding:8px 40px 8px 10px;border:1px solid #ddd;-webkit-border-radius:4px;-moz-border-radius:4px;border-radius:4px;font-family:georgia;font-style:italic;-webkit-box-shadow:1px 1px 2px #dfdfdf;-moz-box-shadow:1px 1px 2px #dfdfdf;box-shadow:1px 1px 2px #dfdfdf;font-size:14px;color:#666;}.emailbutton{-webkit-border-top-right-radius:4px;-webkit-border-bottom-right-radius:4px;-moz-border-radius-topright:4px;-moz-border-radius-bottomright:4px;border-top-right-radius:4px;border-bottom-right-radius:4px;-webkit-border-top-left-radius:0px;-webkit-border-bottom-left-radius:0px;-moz-border-radius-topleft:0px;-moz-border-radius-bottomleft:0px;border-top-left-radius:0px;border-bottom-left-radius:0px;padding:9px;position:absolute;right:-2px;top:0;display:block;line-height:16px;}.emailbutton{padding:8px !important;}.emailform, .emailinput{width:98% !important;-webkit-box-sizing:border-box;-moz-box-sizing:border-box;box-sizing:border-box;height:auto;}
    </style><center><div style='font-size: 22px;'><b>Share this article with your friends.</b></div><p id='socialicons'><a expr:href='&quot;http://plus.google.com/share?url=&quot; + data:post.url' rel='external nofollow' target='_blank'><img border='0' src='https://blogger.googleusercontent.com/img/b/R29vZ2xl/AVvXsEiDmrBtTIvQjgRNYtiZLqOXZIwwRMi5aO4UKdIWbXOljegawrvQXKSNwtlf7M9PKe8iX42GHOVWUrlDiz4-EnrslF2I99DY9HNI60XZyKbEFwExOo7fu_mwjFWvp9ZV_wZ4e_rVRksLGoM/h120/pctoolstips.blogspot.com.png'/></a><a expr:href='&quot;http://www.facebook.com/sharer.php?u=&quot; + data:post.url + &quot;&amp;t=&quot; + data:post.title' rel='external nofollow' target='_blank'><img border='0' src='https://blogger.googleusercontent.com/img/b/R29vZ2xl/AVvXsEgGqBjS7D74dfdbTnb587Ft1D-QzqYqHy7caEvwlGovG2GUbt8dlhiGXdQ7iC_PJvq7e3SNcB0ae2A8gkYYscj0LdzsEC4efit7c_1TBaAPukXjTynZynSwYMme7Pgi1xiZcJE5kvrQJiI/h120/pctoolstips.blogspot.com.png'/></a><a expr:href='&quot;http://twitthis.com/twit?url=&quot; + data:post.url + &quot;&amp;title=&quot; + data:post.title' rel='external nofollow' target='_blank'><img border='0' src='https://blogger.googleusercontent.com/img/b/R29vZ2xl/AVvXsEiCWbyIF6cXDET4NJpmG7Q23irJmzJGCIav2fG1s8NL_NJh0BqWKHpTPl2BCKZ8I-OMj5BYVOF8hvAVmK0zCR84Vh7NQuT_l-5hyqgLhzE3BYKfAA0PcIx0UtUuZADU1vU5Xhtv11eD40U/h120/pctoolstips.blogspot.com.png'/></a><a expr:href='&quot;http://digg.com/submit?phase=2&amp;url=&quot; + data:post.url' rel='external nofollow' target='_blank'><img border='0' src='https://blogger.googleusercontent.com/img/b/R29vZ2xl/AVvXsEje_uUyPQc7Z7CjjxWiiXdKBarVU45OdxI4fmllSHyIOjrHTTUBaqiJxeYn4vtrE15a_4AaTRRVrqcFamQTOyoIfwDtlmaA9YuB9xL8d5SSZRhuWx2tG0O6ug726jkbT3giod3krL1jvmk/h120/pctoolstips.blogspot.com.png'/></a><a expr:href='&quot;http://del.icio.us/post?url=&quot; + data:post.url + &quot;&amp;title=&quot; + data:post.title' rel='external nofollow' target='_blank'><img border='0' src='https://blogger.googleusercontent.com/img/b/R29vZ2xl/AVvXsEjhXSmddaE8lQvCyllKNCXpKCkubJ5pf1u368-ST23JPRqGmr6XQpd0jy5HlXkFLcBY6LaSHrOZr_J2Dz_VBDvBweAu5piB2WcBJnuy3W25iDjRTU0ifdqKAfyt-XVTE7o0eJ6jSJwOwVs/h120/pctoolstips.blogspot.com.png'/></a><a expr:href='&quot;http://www.stumbleupon.com/submit?url=&quot; + data:post.url + &quot;&amp;title=&quot; + data:post.title' rel='external nofollow' target='_blank'><img border='0' src='https://blogger.googleusercontent.com/img/b/R29vZ2xl/AVvXsEj8Ibj359e9bbJ5Xq5_iEv3mRyopTBc7lJ5pjbwVk8mRwCjyYwLECTrvzc7ffXwtqmV4VPp83_aAybG23Lv7tqaA_JQ7agMsFdPQsD1pYKM-7iz4KS2EFLh7yLDX8yfPsk5LPKmGwLrLPc/h120/pctoolstips.blogspot.com.png'/></a><a expr:href='&quot;http://www.technorati.com/faves?add=&quot; + data:post.url' rel='external nofollow' target='_blank'><img border='0' src='https://blogger.googleusercontent.com/img/b/R29vZ2xl/AVvXsEgrKkWKAosJntzPW2-nrb7aGxpg0UxqoF2mhide63MkFgGZ3G8qO0aa_N1sOhqhrcFG8A6BycPdlHO1Wr13D1MokoHJm0-Us1eyCUgyXPfaDrL27qrPZv1AQNiYTZiRRNKvWj71Ihb_MjE/h120/pctoolstips.blogspot.com.png'/></a></p><div style='margin:5px 0px 10px 0px; padding:10px; width:590px;float:none; '><div style='float:left; width:272px; border-right:1px solid #ddd;'><iframe allowtransparency='true' frameborder='0' scrolling='no' src='http://www.facebook.com/plugins/likebox.php?href=URL HERE&amp;width=292&amp;colorscheme=light&amp;show_faces=false&amp;border_color&amp;stream=false&amp;header=false&amp;height=62' style='border:none; overflow:hidden; width:292px; height:62px;'/></div><div style='margin:15px 15px 0px 0px; padding:0px; float:right; width:260px;'><iframe allowtransparency='true' class='twitter-follow-button' frameborder='0' scrolling='no' src='http://platform.twitter.com/widgets/follow_button.html#_&amp;id=twitter-widget-0&amp;lang=en&amp;screen_name=USERNAME2&amp;show_count=true&amp;show_screen_name=true&amp;size=l' style='width: 266px; height: 32px;' title='Twitter Follow Button'/><script src='http://platform.twitter.com/widgets.js' type='text/javascript'/></div></div><div class="email"><form action="http://feedburner.google.com/fb/a/mailverify" method="post" target="popupwindow" onsubmit="window.open('http://feedburner.google.com/fb/a/mailverify?uri=USERNAME1', 'popupwindow', 'scrollbars=yes,width=550,height=520');return true" class="emailform"><input type="hidden" value="USERNAME1" name="uri" /><input type="hidden" name="loc" value="en_US" /><input type="text" onblur="if (this.value == &quot;&quot;) {this.value = &quot;Enter your email...&quot;;}" onfocus="if (this.value == &quot;Enter your email...&quot;) {this.value = &quot;&quot;}" value="Enter your email..." name="email" class="emailinput" /><input type="submit" class="emailbutton" value="SignUp" title='' /></form></div><div dir="ltr" style="text-align: Right;" trbidi="on"><a href="
    http://makemoneyonline72.blogspot.com/2015/01/add-social-sharing-icons-with-email.html" target="_blank" ><span style="font-size: xx-small;">Get This</span></a></div></center></b:if>

    Customize this Widget

    4- Replace USERNAME1 with your Feed Burner user name {by pressing Ctrl+F}

    5- Replace URL HERE with you Facebook fan page URL

    6- Replace USERNAME2 with you Twitter user name. 

    7- Save Targeted widget and Enjoy.

    Note: If this widget doesn't appear after paste Code, then find next [ <data:post.body/> ] code and paste widget code just after it. In case of me I was find this code for 4 time then paste widget code, So Widget will be show below every post

    I hope you enjoyed this featured post. And I'm sure It's working for you. If you have any question and query please ask me in comment section and remember don't forget to share this post with your friends in social media sites.


    Add Attractive Email Subscription Widget in Blogger

    Add amazing RSS Subscription Form: This is really a very great feature to add like this widget in blogger, by adding this widget you can easily increase your Subscribers and Viewers. If you provides useful and healthy content to your viewers, then some times your readers need to get latest newsletter from blog, that's why you should add Email subscription form in your blog.

    Add RSS Subscription form in blogger:


    You just need to follow given below steps.

    * Go to desired blog > > Select Layout > > Click on "Add a Gadget" link

    * From the popup window, scroll down and click on the "HTML/JavaScript" gadget


    * Now Copy the given below code and paste in empty "HTML/JavaScript" gadget.


         <style>
        .hl-email{
        background:url(
        https://blogger.googleusercontent.com/img/b/R29vZ2xl/AVvXsEi5N6rV9OxpO_OCHG5ePmY5ZD3pO2u9KYJ-Kk5w6u7q6ORHeFLKUiwhQur4Ed5CgyL40pGnz0y_x6DpZvSLr7SJhsqj-5LWshlCuwCX8lco1JXV509vaOO4c51stsxXqF-88m3tkGMpcLQ/s1600/mail.png) no-repeat 0px 12px ;
        width:300px;
        padding:10px 0 0 55px;
        float:left;
        font-size:1.4em;
        font-weight:bold;
        margin:0 0 10px 0;
        color:#686B6C;
        }
        .hl-emailsubmit{
        background:#9B9895;
        cursor:pointer;
        color:#fff;
        border:none;
        padding:3px;
        text-shadow:0 -1px 1px rgba(0,0,0,0.25);
        -moz-border-radius:6px;
        -webkit-border-radius:6px;
        border-radius:6px;
        font:12px sans-serif;
        }
        .hl-emailsubmit:hover{
        background:#E98313;
        }
        .textarea{
        padding:2px;
        margin:6px 2px 6px 2px;
        background:#f9f9f9;
        border:1px solid #ccc;
        resize:none;
        box-shadow:inset 1px 1px 1px rgba(0,0,0,0.1);
        -moz-box-shadow:inset 1px 1px 1px rgba(0,0,0,0.1);
        -webkit-box-shadow:inset 1px 1px 1px rgba(0,0,0,0.1); font-size:13px;
        width:
        130px;
        color:#666;}
        </style>
        <div class="hl-email">
        Subscribe via Email <form action="http://feedburner.google.com/fb/a/mailverify" id="feedform" method="post" target="popupwindow" onsubmit="window.open('
        http://feedburner.google.com/fb/a/mailverify?uri=makemoneyonline-72', 'popupwindow', 'scrollbars=yes,width=550,height=520');return true">
        <input gtbfieldid="3" class="textarea" name="email" onblur="if (this.value == &quot;&quot;) {this.value = &quot;Enter email address here&quot;;}" onfocus="if (this.value == &quot;Enter email address here&quot;) {this.value = &quot;&quot;;}" value="Enter email address here" type="text" />
        <input type="hidden" value=”makemoneyonline-72" name="uri"/><input type="hidden" name="loc" value="en_US"/>
        <input class="hl-emailsubmit" value="Submit" type="submit" />
        </form>
        </div>

        Setting:


        * Replace the URL in green to change the Email icon.

        * To change the width or the text area, increase/decrease 130px in red.


        * Replace the 'http://feedburner.google.com/fb/a/mailverify?uri=makemoneyonline-72' with 
        your feed burner url.

        * Replace the "makemoneyonline-72" with your feed burner name.


        * Now Save the widget, and again save Layout.


            Keep visiting this blog to get latest post. Don't forget to share this post with your Friends on Social Media Sites.

            Sunday, January 11, 2015

            Add Facebook JQuery Popup like box with BackGround Image in Blogger

            As you know Facebook is the largest social media site in world and billion of people are attached to it. You can share your thoughts and ideas with your friends on Facebook. Specially if you have Blogs or Websites then you must want to be popular on facebook. Facebook is that place where you can have more and more back-links. If you have a Website/Blog without interconnected social media then your Website/Blog may be worthless. So here I'm going to introduce a think that is very useful for your Blog ranking. So that is known as.

            Facebook-like-box

            Facebook popup Widget:

            How it is useful for your Blog/Website? It is useful as a visitor click on your website there will be automatic popup of this widget. If a visitors wants to like your facebook page, he will like the page without doing anything further. 

            Add this Widget on your Blog:

            1. Firstly open the Blog on which you want to add this widget
            2. Go to > Layout > Add a Gadget
            3. Select HTML/JavaScript after this
            4. Put this code given below
            <script src="http://makingdifferent.github.com/blogger-widgets/[www.gj37765.blogspot.com]jquery.colorbox-min.js"></script>
            <style type="text/css">
            #colorbox, #cboxOverlay, #cboxWrapper{
            position:absolute;
            top:0;left:0;
            z-index:9999;
            overflow:hidden;
            }
            #cboxOverlay{
            position:fixed;
            width:100%;
            height:100%;
            }
            #cboxMiddleLeft,#cboxBottomLeft{
            clear:left;
            }
            #cboxContent{
            position:relative;
            }
            #cboxLoadedContent{
            overflow:auto;
            }
            #cboxTitle{
            margin:0;
            }
            #cboxLoadingOverlay,#cboxLoadingGraphic{
            position:absolute;
            top:0;left:0;
            width:100%;
            }
            #cboxPrevious, #cboxNext, #cboxClose,#cboxSlideshow{
            cursor:pointer;
            }
            .cboxPhoto{
            float:left;
            margin:auto;
            border:0;
            display:block;
            }
            .cboxIframe{
            width:100%;
            height:100%;
            display:block;
            border:0;
            }
            #cboxOverlay{
            background:#000000;
            opacity:0.5 !important;
            }
            #colorbox{
            /*box-shadow*/
            -webkit-box-shadow:0 0 15px rgba(0,0,0,0.4);
            -moz-box-shadow:0 0 15px rgba(0,0,0,0.4);
            box-shadow:0 0 15px rgba(0,0,0,0.4);
            }
            #cboxTopLeft{
            width:14px;
            height:14px;
            background:url(http://3.bp.blogspot.com/-UFvsMA0xw_s/TwRGZN6BBGI/AAAAAAAACNA/_z47WNmUOfs/s1600/%255Bwww.gj37765.blogspot.com%255Dcontrols.png) no-repeat 0 0;
            }
            #cboxTopCenter{
            height:14px;
            background:url(http://2.bp.blogspot.com/-3KW95qDrjH0/TwRGYol22fI/AAAAAAAACM4/lCr80B0MD2U/s1600/%255Bwww.gj37765.blogspot.com%255Dborder.png) repeat-x top left;
            }
            #cboxTopRight{
            width:14px;
            height:14px;
            background:url(http://3.bp.blogspot.com/-UFvsMA0xw_s/TwRGZN6BBGI/AAAAAAAACNA/_z47WNmUOfs/s1600/%255Bwww.gj37765.blogspot.com%255Dcontrols.png) no-repeat -36px 0;
            }
            #cboxBottomLeft{
            width:14px;
            height:43px;
            background:url(http://3.bp.blogspot.com/-UFvsMA0xw_s/TwRGZN6BBGI/AAAAAAAACNA/_z47WNmUOfs/s1600/%255Bwww.gj37765.blogspot.com%255Dcontrols.png) no-repeat 0 -32px;
            }
            #cboxBottomCenter{
            height:43px;
            background:url(http://2.bp.blogspot.com/-3KW95qDrjH0/TwRGYol22fI/AAAAAAAACM4/lCr80B0MD2U/s1600/%255Bwww.gj37765.blogspot.com%255Dborder.png) repeat-x bottom left;
            }
            #cboxBottomRight{
            width:14px;
            height:43px;
            background:url(http://3.bp.blogspot.com/-UFvsMA0xw_s/TwRGZN6BBGI/AAAAAAAACNA/_z47WNmUOfs/s1600/%255Bwww.gj37765.blogspot.com%255Dcontrols.png) no-repeat -36px -32px;
            }
            #cboxMiddleLeft{width:14px;background:url(http://3.bp.blogspot.com/-UFvsMA0xw_s/TwRGZN6BBGI/AAAAAAAACNA/_z47WNmUOfs/s1600/%255Bwww.gj37765.blogspot.com%255Dcontrols.png) repeat-y -175px 0;
            }
            #cboxMiddleRight{
            width:14px;background:url(http://3.bp.blogspot.com/-UFvsMA0xw_s/TwRGZN6BBGI/AAAAAAAACNA/_z47WNmUOfs/s1600/%255Bwww.gj37765.blogspot.com%255Dcontrols.png) repeat-y -211px 0;
            }
            #cboxContent{
            background:#fff;
            overflow:visible;
            }
            #cboxLoadedContent{
            margin-bottom:5px;
            }
            #cboxLoadingOverlay{background:url(http://3.bp.blogspot.com/-7VRvnW_MUSw/TwRGXjXjloI/AAAAAAAACM0/5K-J5jgkxo4/s1600/%255Bwww.gj37765.blogspot.com%255Dloadingbackground.png) no-repeat center center;
            }
            #cboxLoadingGraphic{background:url(http://3.bp.blogspot.com/-xjj51r2lm2M/TwRGaKezqHI/AAAAAAAACNI/lKX9_-YUUdY/s1600/%255Bwww.gj37765.blogspot.com%255Dloading.gif) no-repeat center center;
            }
            #cboxTitle{
            position:absolute;bottom:-25px;
            left:0;
            text-align:
            center;width:100%;
            font-weight:bold;
            color:#7C7C7C;
            }
            #cboxCurrent{
            position:absolute;
            bottom:-25px;
            left:58px;
            font-weight:bold;
            color:#7C7C7C;
            }
            #cboxPrevious, #cboxNext, #cboxClose, #cboxSlideshow{
            position:absolute;
            bottom:-29px;
            background:url(http://3.bp.blogspot.com/-UFvsMA0xw_s/TwRGZN6BBGI/AAAAAAAACNA/_z47WNmUOfs/s1600/%255Bwww.gj37765.blogspot.com%255Dcontrols.png) no-repeat 0px 0px;
            width:23px;
            height:23px;
            text-indent:-9999px;
            }
            #cboxPrevious{
            left:0px;
            background-position:-51px -25px;
            }
            #cboxPrevious.hover{
            background-position:-51px 0px;
            }
            #cboxNext{
            left:27px;
            background-position:-75px -25px;
            }
            #cboxNext.hover{
            background-position:-75px 0px;
            }
            #cboxClose{
            right:0;
            background-position:-100px -25px;
            }
            #cboxClose.hover{
            background-position:-100px 0px;
            }
            .cboxSlideshow_on #cboxSlideshow{
            background-position:-125px 0px;
            right:27px;
            }
            .cboxSlideshow_on #cboxSlideshow.hover{
            background-position:-150px 0px;
            }
            .cboxSlideshow_off #cboxSlideshow{
            background-position:-150px -25px;
            right:27px;
            }
            .cboxSlideshow_off #cboxSlideshow.hover{
            background-position:-125px 0px;
            }
            #mdfb{
            font:12px/1.2 Arial,Helvetica,san-serif;color:#666;
            }
            #mdfb a,#mdfb a:hover,#mdfb a:visited{
            text-decoration:none;
            }
            .mdbox-title{
            background:#000;
            color:#fff;
            font-size:20px !important;
            font-weight:bold;
            margin:10px 0;
            border:20px solid #ddd;
            /*border-radius*/
            -webkit-border-radius:6px;
            -moz-border-radius:6px;
            border-radius:6px;
            /*box-shadow*/
            -webkit-box-shadow:5px 5px 5px #CCCCCC;
            -moz-box-shadow:5px 5px 5px #CCCCCC;
            box-shadow:5px 5px 5px #CCCCCC;
            padding:10px;
            line-height:25px;
            font-family:arial !important;
            }
            .mdbox-tagline{
            color:#999;
            margin:0;
            text-align:center;
            }
            #mdsubs-container{
            padding:35px 0 30px 0;
            position:relative;
            }a:link,a:visited{
            border:none;
            }
            .demo{
            display:none;
            }
            </style>
            <script type="text/javascript">
            jQuery(document).ready(function(){
            if (document.cookie.indexOf('visited=true') == -1) {
            var fifteenDays = 1000*60*60*24*30;
            var expires = new Date((new Date()).valueOf() + fifteenDays);
            document.cookie = "visited=true;expires=" + expires.toUTCString();
            $.colorbox({width:"600px", inline:true, href:"#mdfb"});
            }});
            </script>
            <div style='display:none'>
            <div id='mdfb' style='padding:10px; background:#fff;'>
            <center>
            <table align="center"background="https://blogger.googleusercontent.com/img/b/R29vZ2xl/AVvXsEgmNr665Pk4puX1w0gj-BgHBBYRB_IcRM-lj1VDjsPMNCh99rJE-f9Z1EgQhctKZVtkewcSboLc7Mo_3by-jkjH0zLxs0So3SV8x5a4xBafVZJK3jLspJFfGQjwx-0Db7N9zj1IvpBjCuSU/s1600/adsense+background+image%2528gj37765.blogspot.com.jpg.png" border="0" height="300" style="width: 505px;">
            <tbody>
            <tr>
            <td height="345" width="505">
            <div align="right">
            <iframe src="//www.facebook.com/plugins/likebox.php?href=https://www.facebook.com/earnmoneyonline72&width=350&colorscheme=light&show_faces=true&border_color=%23ffffff&stream=false&header=false&height=250" scrolling="no" frameborder="0" style="border:none; overflow:hidden; width:350px; height:250px;" allowtransparency="true">
            </iframe></div>
            </td>
            </tr>
            </tbody>
            </table>
            </center>
            <p style=" float:right;margin-right:35px;font-size:9px;">
            By <a style=" font-size:9px;color:#3B78CD;text-decoration:none;" href="
            http://makemoneyonline72.blogspot.com/2015/01/add-facebook-jquery-popup-like-box-with.html">MakeMoneyOnline72</a> | <a style=" font-size:9px;color:#3B78CD;text-decoration:none;" href="http://makemoneyonline72.blogspot.com/2015/01/add-facebook-jquery-popup-like-box-with.html ">Get This !</a>
            </p>
            </div>
            </div>

            Recommended: How to Make Money through Facebook.

            Customize: 

            • Replace the earnmoneyonline72 with your facebook page name.
            • If you want every time popup of this widget simply replace true with false

            Note: By adding this code on Blog if it doesn't appear, it means there is no JQuery script in your template. So in order to appear this Facebook popup box you must add Jquery script in your template. How? Follow the given steps.

            How to Add:

            • Go to > Blogger Dashboard > TemplateEdit HTML
            • Add the given below code before </head> tag, save the template
            <script src="https://ajax.googleapis.com/ajax/libs/jquery/1.7.1/jquery.min.js"></script>
             Also share this info. with your friends on Social Media Sites and follow us on Facebook, Twitter and Google+.

              Thursday, December 18, 2014

              Increase Your Google AdSense Earnings

              For a little over a month now, I’ve been looking at my AdSense earnings in Google Analytics to better understand my earnings, and I’ve stumbled across some rather interesting results. Without even realising it, I’ve come up with even more ways to increase my AdSense earnings each month. They range from simple ad placement, to writing specific posts, and appealing to a certain referrer. Here’s how you can increase YOUR earnings.

              Setting Up

              The first thing you’ll want to do is set up your AdSense so that you can study it in more detail, in Analytics. To do this, when you’re viewing your report overview, just click the link to integrate Adsense with your Analytics account. It’s just one click and then a small amount of information on your Analytics account. You have to be an admin on your Analytics account, otherwise it won’t let you make the changes necessary, but if you’re the only person running the website, this shouldn’t be a problem. NOTE: Because you’re adding new information, GA will not transfer over details from the past, you will only see new results from when your join the two together.
              Now that you’re set up, it’s best to have a run down of what all the terms mean, so that you can understand your results better.
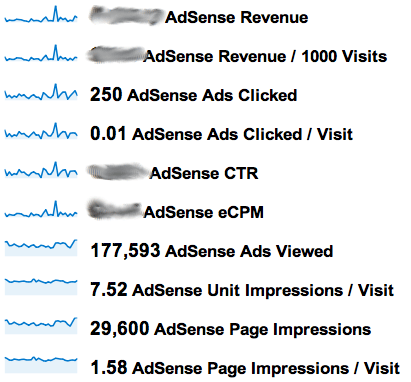
              AdSense Revenue is the amount of money you’ve made in your selected time period (2 weeks for me).
              / 1000 visits, is how much money you’ve made for every 1000 visits to your site.
              Ads clicked, is the amount of ads clicked by viewers.
              Ads clicked / visit, is the total number of visits, divided by the number of ads clicked.
              CTR stands for Click Through Rate and this is the percentage of clicks you get for each ad impression.
              eCPM stands for effective Cost Per 1000 impressions (M being a roman numeral). It’s the total earnings per 1000 impressions.
              AdSense Ads Viewed is the total number of ads seen, from all multiple ads on all the pageviews.
              AdSense Unit Impressions / Visit is the number of ads that are viewed by visitors, per visit.
              AdSense Page Impressions is the amount of pages viewed that have AdSense ads on them.
              AdSense Page Impressions / Visit is similar to pages viewed per visit, only it’s pages with ads viewed, per visit.

              Tip #1 – Appeal To Your Top Referrers

              By far, my favourite thing about using Analytics to look at your AdSense, is that you can then find out which of your referrers are worth the most in terms of AdSense revenue. My results were rather shocking for me. For quite a while now, I’ve been featured on the homepage of a photography forum with about 7000 active members, but that’s grown a lot more over the last month or so. I don’t get a massive amount of traffic from them, as I currently only have 1 link on their homepage, but when I do, it’s worth a lot to me.
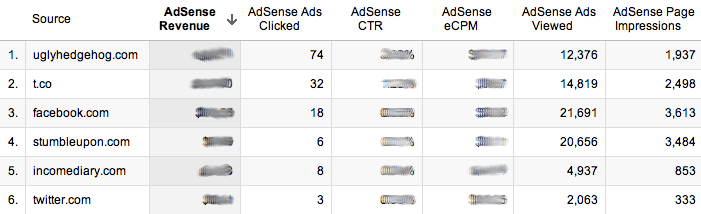
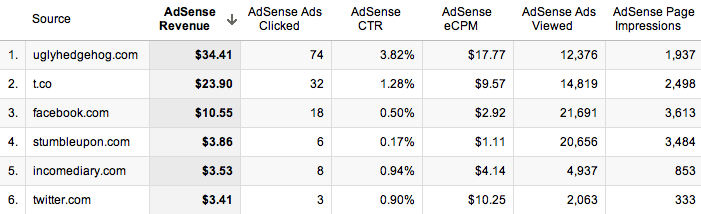
              Let me show you an example of what happened. When you go into the new GA, click on Content, then AdSense, then AdSense Referrers, this will bring up a list of all the websites that sent visitors who have clicked on an ad, as well as a timeline of your earnings. The results below are for a complete month, and unfortunately, due to Google’s rules and regulations, I’m not allowed to show you them, so you’ll just have to take my word for it. The most important part of the results isn’t the ads clicks, viewed, or even the revenue; it’s the Click Through Rate (CTR) and eCPM (effective Cost Per 1000 impressions).
              As we discovered earlier, the CTR is the percentage of ads that are clicked, per impression, so you want that to be as high as possible. The reason the CTR is much higher than some of the other referrers is because of the quality of visitor that I’m receiving from that referrer. StumbleUpon has a particularly poor CTR, because the people who use it aren’t looking for anything in particular so it’s hard to get their attention, which may result in them clicking on an ad. UglyHedgehog on the other hand is a forum for photographers, so the people on that site are actively looking for content in my niche.
              The eCPM is also substantially higher than the other referrers, which tells me that if I can increase the number of impressions that I’m getting from them, then I will earn a lot more money. The quality of Twitter user is usually pretty poor, as they don’t typically spend too much time on the site (00:01:47), and even though a link a lot to my website  around 10 times a day through Twitter, I still get less traffic from them than Facebook. Facebook on the other hand has a better quality of visitor, with people looking at more pages and staying for longer (00:02:29, but their eCPM is actually lower than that of Twitter.
              From these findings I can conclude that very high quality traffic, such as forums in your niche (uglyhedgehog.com has an average time on site of 00:04:09 and 2.19 pages per visit), will make you much more money, just so long as you can get the traffic you’re after. People are less likely to click on ads when they’ve come from websites such as Facebook, as they’re more interested in the content that you’ve written. They provide a good quality of visitor, but their time on site is almost half that of the forum in my niche, so it’s important to find a good balance of visitor quality. Twitter users seem to behave differently to other users, as they’re in a browsing mode, and are clicking on content that they see in their feed before it disappears. It would appear that they treat the websites they visit in a similar way, by clicking on more ads. I actually get more traffic from Facebook, but my earnings from Twitter far outweigh those of Facebook, which is good really, because it’s much more acceptable to post multiple links on Twitter.

              Tip #2 – Write Content That Links Within Your Site

              This step produced shockingly good results for my earnings. If you look have a look at my graph below, you’ll see that on the 6th of November, there was a massive increase in earnings. The first thing I did was look back to that day to see which post I had published, and I found a post titled ‘A Beginner’s Guide To Photography’, and this was simply a collection of my tutorials. This meant that anyone who had viewed the page would have to click on another if they wanted to learn anything. This forced them to increase their pages per visit, which produces more ad impressions.
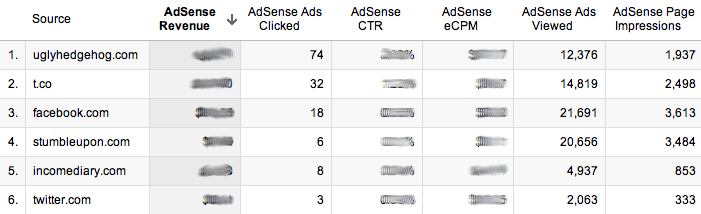
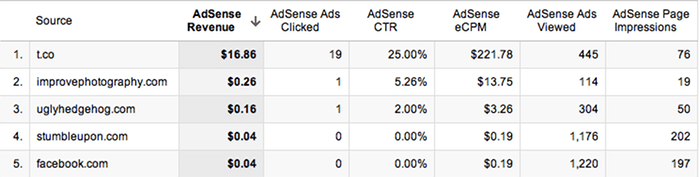
              When I break down my earnings so that I’m only receiving information from the 6th of November, I can start to see which referrer is earning me the most money. T.co is the URL shortener that Twitter uses, so I can see clearly that a small number of page impressions has yielded very strong earnings. With a large number of clicks from 76 page impressions, I have an unusually high CTR. From this response, I can see that to earn money, this is the sort of content that I need to be promoting, though as many sources as I can. I’m currently combining this content, with the forum mentioned in the tip above, so that I can drive top quality traffic, to the content that earns me the most money. After just 2 days of doing this, I’m already starting to notice a massive improvement.

              Tip #3 – Text and Image Ads

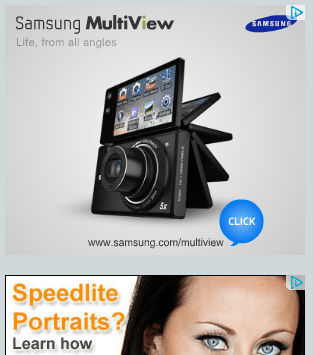
              Enabling your ad units to display both text and image/rich media ad types, increases the number of ads competing to appear on your site. More advertisers in the ad auction drives higher bids and more revenue for you. On average, publishers see a 59% increase in eCPM earnings when they make these recommended changes. If you’re not already using both, then it’s as simple as going into the ‘My ads’ tab, and clicking on ‘Edit ad type’, next to the ad in the list. This will increase the cost per click, so even if you’re not improving the number of clicks that your website is getting, you’ll still make more money.

              Tip #4 – Increase Ad Size

              Advertisers prefer wider ad units for their premium inventory, resulting in higher bids for your ad placements. Though all sites are different, publishers typically see 0.35 eCPMs when using the wider ad size. You can start by simply changing single ads on popular pages to see how well they work, and if it’s not too intrusive, then you can start rolling it out across your whole website. I didn’t do this in my sidebar because I was aware that the whole width of the sidebar would have to change, and that would not only take a lot of time, but mess up the spacing that I had laid out for posts. Instead, I added a wider ad at the end of each post, that differs to all the other ads on my website, and this saw a good improvement in ad sales.

              Tip #5 – Ad Placement

              Where you choose to place the ad on your site will make a big difference to the amount of clicks that you get, because the more obvious the ad, the more likely someone will be to see it. It’s hard to judge on your own website because we look at our sites differently to how other people view them, so the best way to start seeing results, is to experiment with ad placement. When I first started, I had two ads on my website, one at the top of the sidebar, and one at the bottom. Since then, we’ve added another ad to the side bar, and reloated the bottom one to under the subscribe button, added an ad to the bottom of each post, and put a small text ad just below our header.
              The small text ad below our header made the biggest difference to our results because it stands out the most to new visitors, and could even be possibly mistaken for a link within our own website. It’s a very simple ad, and less appealing than a flash one, but it’s much less intrusive, and in a better position. Overall, I don’t like to add too many ads because I don’t want to put off visitors or make my website look bad. I always find it odd when people choose to include an ad block in their header, because that makes me find their website much less appealing.

              Top 15 Google Adsense Tips

              Google AdSense is a pay-per-click (PPC) program that can give you advertising revenue from each page on your website with a minimal investment in time and no additional resources.

              AdSense delivers relevant ads that are targeted to the content people find on your site.

              In many advertising networks and websites, including AdSense, the advertiser is charged for advertising their ad only when a user clicks on their ad. How much they pay (for that click) is called their Cost Per Click or CPC.

              Here you will find some simple and effective AdSense tips that will increase your revenue. If you haven't already joined AdSense program, you should sign up first. 

              Now it's time to show you some tips and tricks that will optimize your AdSense ads.


              Top 15 AdSense tips

              AdSense Tip #1: Find your keywords


              Before serving ads on a web page, check its keyword density. A free and advanced tool for finding the most prominent keywords in a page can be found here: SEO Density Analyzer. Copy the most important keywords to a text file ([web page name]-adsense-keywords.txt).

              AdSense Tip #2: Improve your keywords


              Get keyword suggestions from Overture Search Inventory and from Google AdWords Sandbox. Get new keywords that can help you improve your ad relevance. Enter the keywords from [web page name]-adsense-keywords.txt and save the suggestions to [web page name]-adsense-suggestions.txt.

              AdSense Tip #3: Keep your website focused on a theme


              Use the keyword suggestions to enhance your web pages and to build theme-based content. And also try to get your keywords into the anchor text of your incoming links as much as possible. Don't forget that Google AdSense is keyword-targeted advertising: Google AdSense bases its advert topics on your websites content, this means that content-rich websites of a popular topic should attract a large amount of ads.

              AdSense Tip #4: Write a new page every day


              One of the best tips is to add a new page to your web site every day. The more content you have, the more visitors you will get. Put an Adsense unit on each and every content page of your site. But where? You will find more about that from the next AdSense tips.

              AdSense Tip #5: Choose the right AdSense format


              Wider formats are successful because the ads are compact, easy to read and are complementary to the content. The top three AdSense formats are:
              1. 336x280 large rectangle
              2. 300x250 medium rectangle
              3. 160x600 wide skyscraper

              Another successful format is the 468x15 horizontal ad links, that can be placed under your navigation bar.

              More AdSense Tips

              • AdSense Tip #6: Color tips
              • AdSense Tip #7: Position tips
              • AdSense Tip #8: Increase the number of ads
              • AdSense Tip #9: Preview Google ads
              • AdSense Tip #10: What not to do
              • Plus: official Google AdSense tips